Rust on MIPS64 Windows NT 4.0
Introduction
Some part of me has always been fascinated with coercing code to run in weird places. I scratch this itch a lot with my security research projects. These often lead me to writing shellcode to run in kernels or embedded hardware, sometimes with the only way being through an existing bug.
For those not familiar, shellcode is honestly hard to describe. I don’t know if there’s a very formal definition, but I’d describe it as code which can be run in an environment without any external dependencies. This often means it’s written directly in assembly, and directly interfaces with the system using syscalls. Usually the code can be relocated and often is represented as a flat image rather than a normal executable with multiple sections.
To me, this is extra fun as it’s effectively like operating systems development. You’re working in an environment where you need to bring most of what you need along with you. You probably want to minimize the dependencies you have on the system and libraries to increase compatibility and flexibility with the environments you run. You might have to bring your own allocator, make your own syscalls, maybe even make a scheduler if you are really trying to minimize impact.
Some of these things may seem silly, but when it comes to bypassing anti-viruses, exploit detection tools, and even mitigations, often the easiest thing to do is just avoid the common APIs that are hooked and monitored.
Streams
Before we get into it, it’s important to note that this work has been done over 3 different live streams on my Twitch! You can find these archived on my YouTube channel. Everything covered in this blog can be viewed as it happened in real time, mistakes, debugging, and all!
The 3 videos in question are:
Day 1 - Getting Rust running on Windows NT 4.0 MIPS64
Day 2 - Adding memory management and threading to our Rust on Windows NT MIPS
Day 3 - Causing NT 4.0 MIPS to bluescreen without even trying
Source
This project has spun off 3 open-source GitHub repos, one for the Rust on NT
MIPS project in general, another for converting ELFs to flat images, and a
final one for parsing .DBG symbol files for applying symbols to Binary Ninja
or whatever tool you want symbols in! I’ve also documented the commit hashes
for the repos as of this writing if things have changed since you’ve read this!
Don’t forget to follow me on socials and like and subscribe of course. Maybe eventually I can do research and education full time!~ Oh, also follow me on my Twitter @gamozolabs
MIPS on Windows NT
Windows NT actually has a pretty fascinating history of architecture support. It supported x86 as we know and love, but additionally it supported Alpha, ARM, and PowerPC. If you include the embedded versions of Windows there’s support for some even more exotic architectures.
MIPS is one of my favorite architectures as the simplicity makes it really fun to develop emulators for. As someone who writes a lot of emulators, it’s often one of my first targets during development, as I know it can be implemented in less than a day of work. Finding out that MIPS NT can run in QEMU was quite exciting for me. The first time I played around with this was maybe ~5 years ago, but recently I thought it’d be a fun project to demonstrate harnessing of targets for fuzzing. Not only does it have some hard problems in harnessing, as there are almost no existing tools for working with MIPS NT binaries, but it also leads us to some fun future projects where custom emulators can come into the picture!
There’s actually a fantastic series by Raymond Chen which I highly recommend you check out here.
There’s actually a few of these series by Raymond for various architectures on NT. They definitely don’t pull punches on details, definitely a fantastic read!
Running Windows NT 4.0 MIPS in QEMU
Getting NT 4.0 running in QEMU honestly isn’t too difficult. QEMU already
supports the magnum machine, which runs on a R4000 MIPS processor, the first
64-bit MIPS processor, running an implementation of the MIPS III ISA.
Unfortunately, out of the box it won’t quite run, as you need a BIOS/bootloader
capable of booting Windows, maybe it’s video BIOS, I don’t know. You can
find this here.
Simply extract the file, and rename NTPROM.RAW to mipsel_bios.bin.
Other than that, QEMU will be able to just run NT 4.0 out of the box. There’s a bit of configuration you need to do in the BIOS to get it to detect your CD, and you need to configure your MAC address otherwise networking in NT doesn’t seem to work beyond a DHCP lease. Anyways, you can find more details about getting MIPS NT 4.0 running in QEMU here.
I also cover the process I use, and include my run.sh script here.
#!/bin/sh

ISO="winnt40wks_sp1_en.iso"
#ISO="./Microsoft Visual C++ 4.0a RISC Edition for MIPS (ISO)/VCPP-4.00-RISC-MIPS.iso"

qemu-system-mips64el \
    -M magnum \
    -cpu VR5432 \
    -m 128 \
    -net nic \
    -net user,hostfwd=tcp::5555-:42069 \
    -global ds1225y.filename=nvram \
    -global ds1225y.size=8200 \
    -L . \
    -hda nt4.qcow2 \
    -cdrom "$ISO"
Getting code running on Windows NT 4.0
Surprisingly, a decent enough environment for development is readily available
for NT 4.0 on MIPS. This includes symbols (included under
SUPPORT/DEBUG/MIPS/SYMBOLS on the original ISO), as well as debugging tools
such as ntsd, cdb and mipskd (command-line versions of the WinDbg command
interface you may be familiar with), and the cherry on top is a fully working
Visual Studio 4.0 install that will work right inside the MIPS guest!
With Visual Studio 4.0 we can use both the full IDE experience for building
projects, but also the command line cl.exe compiler and nmake, my preferred
Windows development experience. I did however use VS4 for the editor as I’m
not using 1996 notepad.exe for writing code!
Unless you’re doing something really fancy, you’ll be surprised to find much of the NT APIs just work out of the box on NT4. This includes your standard way of interacting with sockets, threads, process manipulation, etc. A few years ago I wrote a snapshotting tool that used all the APIs that I would in a modern tool to dump virtual memory regions, read them, and read register contexts. It’s pretty neat!
Nevertheless, if you’re writing C or C++, other than maybe forgetting about variables having to be declared at the start of a scope, or not using your bleeding edge Windows 10 APIs, it’s really no different from modern Windows development. At least… for low level projects.
Rust and Me
After about ~10 years of writing -ansi -pedantic C, where I followed all the
old fashioned rules of declaring variables at the start of scopes, verbose
syntax, etc, I never would have thought I would find myself writing in a
higher-level language. I dabbled in C++ but I really didn’t like the
abstractions and confusion it brought, although that was arguably when I was
a bit less experienced.
Nevertheless, I found myself absolutely falling in love with Rust. This was a pretty big deal for me as I have very strong requirements about understanding exactly what sort of assembly is generated from the code I write. I spend a lot of time optimizing and squeezing every bit of performance out of my code, and not having this would ruin a language for me. Something about Rust and its model of abstractions (traits) makes it actually pretty obvious what code will be generated, even for things like generics.
The first project I did in Rust was porting my hobby OS to it. Definitely a “thrown into the deep end” style project, but if Rust wasn’t suitable for operating systems development, it definitely wasn’t going to be a language I personally would want to invest in. However… it honestly worked great. After reading the Rust book, I was able to port my OS which consisted of a small hypervisor, 10gbit networking stack, and some fancy memory management, in less than a week.
Anyways, rant aside, as a low-level optimization nerd, there was nothing about Rust, even in 2016, that raised red flags about being able to replace all of my C in it. Of course, I have many complaints and many things I would change or want added to Rust, but that’s going to be the case with any language… I’m picky.
Rust on MIPS NT 4.0
Well, I do all of my projects in Rust now. Even little scripts I’d usually write in Python I often find myself grabbing Rust for. I’m comfortable with using Rust for pretty much any project at this point, that I decided that for a long-ish term stream project (ultimately a snapshot fuzzer for NT), I would want to do this in Rust.
The very first thought that comes to mind is to just build a MIPS executable from Rust, and just… run it. Well, that would be great, but unfortunately there were a few hiccups.
Rust on weird targets
Rust actually has pretty good support for weird targets. I mean, I guess we’re
really just relying on, or limited by cough, LLVM. Not only can you simply
pick your target by the --target triple argument to Rust and Cargo, but also
when you really need control you can define a target specification. This gives
you a large amount of control about the code generated.
For example:
pleb@gamey ~ $ rustc -Z unstable-options --print target-spec-json
Will give you the JSON spec for my native system, x86_64-unknown-linux-gnu
{
  "arch": "x86_64",
  "cpu": "x86-64",
  "crt-static-respected": true,
  "data-layout": "e-m:e-p270:32:32-p271:32:32-p272:64:64-i64:64-f80:128-n8:16:32:64-S128",
  "dynamic-linking": true,
  "env": "gnu",
  "executables": true,
  "has-elf-tls": true,
  "has-rpath": true,
  "is-builtin": true,
  "llvm-target": "x86_64-unknown-linux-gnu",
  "max-atomic-width": 64,
  "os": "linux",
  "position-independent-executables": true,
  "pre-link-args": {
    "gcc": [
      "-m64"
    ]
  },
  "relro-level": "full",
  "stack-probes": {
    "kind": "call"
  },
  "supported-sanitizers": [
    "address",
    "cfi",
    "leak",
    "memory",
    "thread"
  ],
  "target-family": [
    "unix"
  ],
  "target-pointer-width": "64"
}
As you can see, there’s a lot of control you have here. There’s plenty more
options than just in this JSON as well. You can adjust your ABIs, data layout,
calling conventions, output binary types, stack probes, atomic support, and
so many more. This JSON can be modified as you need and you can then pass in
the JSON as --target <your target json.json> to Rust, and it “just works”.
I’ve used this to generate code for targets Rust doesn’t support, like Android on MIPS (okay there’s maybe a bit of a pattern to my projects here).
Back to Rust on MIPS NT
Anyways, back to Rust on MIPS NT. Lets just make a custom spec and get LLVM
to generate us a nice portable executable (PE, the .exe format of Windows)!
Should be easy!
Well… after about ~4-6 hours of tinkering. No. No it is not. In fact, we ran into an LLVM bug.
It took us some time (well, Twitch chat eventually read the LLVM code instead
of me guessing) to find that the correct target triple if we wanted to get
LLVM to generate a PE for MIPS would be mips64el-pc-windows-msvccoff. It’s
a weird triple (mainly the coff suffix), but this is the only path we were
able to find which would cause LLVM to attempt to generate a PE for MIPS. It
definitely seems a bit biased towards making an ELF, but this triple indeed
works…
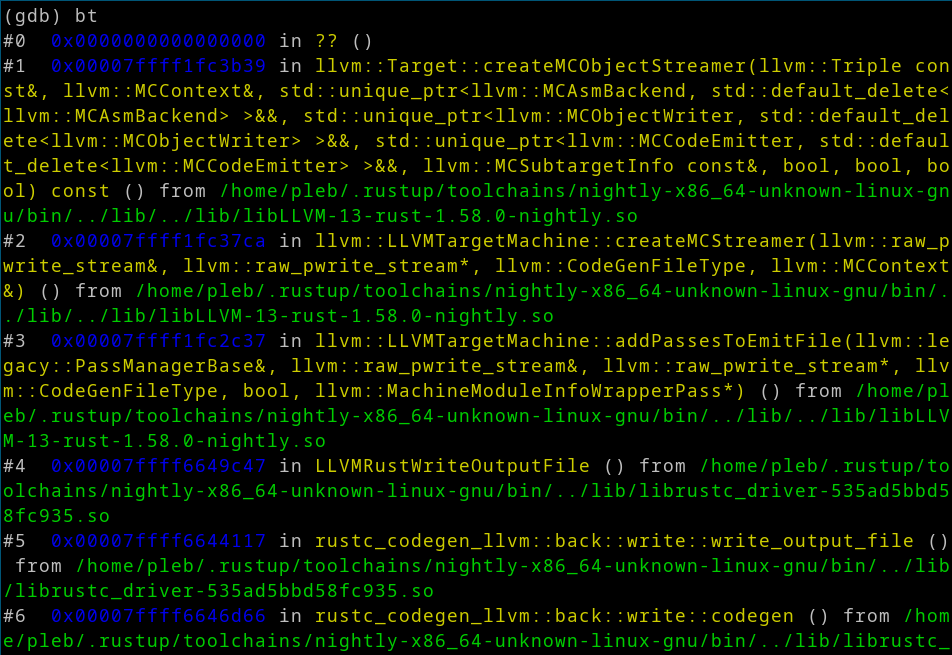
It works at getting LLVM to try to emit a PE, but unfortunately this feature
is not implemented. Specifically, inside LLVM they will generate the MIPS code,
and then attempt to create the PE by calling createMCObjectStreamer. This
function doesn’t actually check any of the function pointers before invoking
them, and it turns out that the COFF streamer defaults to NULL, and for MIPS
it’s not implemented.
Thus… we get a friendly jump to NULL:
Can we add support?
The obvious answer is to quickly take the generic implementation of PE generation in LLVM and make it work for MIPS and upstream it. Well, after a deep 30 second analysis of LLVM code, it looks like this would be more work than I wanted to invest, and after all the issues up to this point my concerns were that it wouldn’t be the end of the problems.
I guess we have ELFs
Well, that leaves us with really one format that LLVM will generate MIPS for us, and that’s ELFs. Luckily, I’ve written my fair share of ELF loaders, and I decided the best way to go would simply be to flatten the ELF into an in-memory representation and make my own file format that’s easy to write a loader for.
You might think to just use a linker script for this, or to do some magic
objcopy to rip out code, but unfortunately both of these have limitations.
Linker scripts are fail-open, meaning if you do not specify what happens with
a second, it will just “silently” be added wherever the linker would have put
it by default. There (to my knowledge) is no strict mode, which means if Rust
or LLVM decide to emit some section name you are not expecting, you might end
up with code not being laid out as you expect.
objcopy cannot output zero-initialized BSS sections as they would be
represented in-memory, so once again, this leads to an unexpected section
popping up and breaking the model you expected.
Of course, with enough effort and being picky you can get a linker script to output whatever format you want, but honestly they kinda just suck to write.
Instead, I decided to just write an ELF flattener. It wouldn’t handle
relocations, imports, exports, permissions or really anything. It wouldn’t even
care about the architecture of the ELF or the payload. Simply, go through each
LOAD section, place them at their desired address, and pad the space between
them with zeros. This will give a flat in-memory representation of the binary
as it would be loaded without relocations. It doesn’t matter if there’s some
crazy custom assembly or sections defined, the LOAD sections are all that
matters.
This tool is honestly relatively valuable for other things, as it can also flatten core dumps into a flat file if you want to inspect a core dump, which is also an ELF, with your own tooling. I’ve written this ELF loader a handful of times that I thought it would be worthwhile writing my best version if this.
The loader simply parses the absolutely required information from the ELF.
This includes checking \x7FELF magic, reading the endianness (affects the
ELF integer endianness), and the bitness (also affects ELF layout). Any other
information in the header is ignored. Then I parse the program headers, look
for any LOAD sections (sections indicated by the ELF to be loaded into
memory) and make the flat file.
The ELF format is fairly simple, and the LOAD sections contain information
about the permissions, virtual address, virtual size (in-memory size), file
offset (location of data to initialize the memory to), and the file size (can
often be less than the memory size, thus any uninitialized bytes are padded
to virtual memory size with zeros).
By concatenating these sections with the correct padding, viola, we have an in-memory representation of the ELF.
I decided to make a custom FELF (“Falk ELF”) format that indicated where this blob need to be loaded into memory, and the entry point address that needed to be jumped into to start execution.
FELF0001 - Magic header
entry    - 64-bit little endian integer of the entry point address
base     - 64-bit little endian integer of the base address to load the image
<image>  - Rest of the file is the raw image, to be loaded at `base` and jumped
           into at `entry`
Simple! You can find the source code to this tool at
My GitHub for elfloader. This
tool also has support for making a raw file, and picking a custom base, not
for relocations, but for padding out the image. For example, if you have the
core dump of a QEMU guest, you can run it through this tool with
elfloader --binary --base=0 <coredump> and it will produce a flat file with
no headers representing all physical memory with MMIO holes and gaps padded
with zero bytes. You can then mmap() the file and write your own tools to
browse through a guests physical memory (or virtual if you write page table
walking code)! Maybe this is a problem I only find myself running into often,
but within a few days of writing this I’ve even had a coworker use it.
Anyways, enough selling you on this first cool tool we produced. We can turn an ELF into an in-memory initial representation, woohoo.
FELF loader
To load a FELF for execution on Windows, we’ll of course need to write a
loader. Of course we could convert the FELF into a PE, but at this point it’s
less effort for us to just use the VC4.0 installation in our guest to write
a very tiny loader. All we have to do is read a file, parse a simple header,
VirtualAlloc() some RWX memory at the target address, copy the payload to
the memory, and jump to entry!
Unfortunately, this is where it started to start to get dicey. I don’t know if it’s my window manager, QEMU, or Windows, but very frequently my mouse would start randomly jumping around in the VM. This meant that I pretty much had to do all of my development and testing in the VM with only the keyboard. So, we immediately scrapped the idea of loading a FELF from disk, and went for network loading.
Remote code execution
As long as we configured a unicast MAC address in our MIPS BIOS (yeah, we learned the hard way that non-unicast MAC addresses randomly generated by DuckDuckGo indeed fail in a very hard to debug way), we had access to our host machine (and the internet) in the guest.
Why load from disk which would require shutting down the VM to mount the disk and copy the file into, when we could just make this a remote loader. So, that’s what we did!
We wrote a very simple client that when invoked, would connect to the server,
download a FELF, load it, and execute it. This was small enough that
developing this inside the VM in VC4.0 was totally fine.
#include <stdlib.h>
#include <stdio.h>
#include <winsock.h>

int
main(void)
{
	SOCKET sock;
	WSADATA wsaData;
	unsigned int len;
	unsigned char *buf;
	unsigned int off = 0;
	struct sockaddr_in sockaddr = { 0 };

	// Initialize WSA
	if(WSAStartup(MAKEWORD(2, 0), &wsaData)) {
		fprintf(stderr, "WSAStartup() error : %d", WSAGetLastError());
		return -1;
	}

	// Create TCP socket
	sock = socket(AF_INET, SOCK_STREAM, IPPROTO_TCP);
	if(sock == INVALID_SOCKET) {
		fprintf(stderr, "socket() error : %d", WSAGetLastError());
		return -1;
	}

	sockaddr.sin_family = AF_INET;
	sockaddr.sin_addr.s_addr = inet_addr("192.168.1.2");
	sockaddr.sin_port = htons(1234);

	// Connect to the socket
	if(connect(sock, (const struct sockaddr*)&sockaddr, sizeof(sockaddr)) == SOCKET_ERROR) {
		fprintf(stderr, "connect() error : %d", WSAGetLastError());
		return -1;
	}

	// Read the payload length
	if(recv(sock, (char*)&len, sizeof(len), 0) != sizeof(len)) {
		fprintf(stderr, "recv() error : %d", WSAGetLastError());
		return -1;
	}

	// Read the payload
	buf = malloc(len);
	if(!buf) {
		perror("malloc() error ");
		return -1;
	}

	while(off < len) {
		int bread;
		unsigned int remain = len - off;
		bread = recv(sock, buf + off, remain, 0);
		if(bread <= 0) {
			fprintf(stderr, "recv(pl) error : %d", WSAGetLastError());
			return -1;
		}

		off += bread;
	}

	printf("Read everything %u\n", off);

	// FELF0001 + u64 entry + u64 base
	if(len < 3 * 8) {
		fprintf(stderr, "Invalid FELF\n");
		return -1;
	}

	{
		char *ptr = buf;
		unsigned int entry, base, hi, end;

		if(memcmp(ptr, "FELF0001", 8)) {
			fprintf(stderr, "Missing FELF header\n");
			return -1;
		}
		ptr += 8;

		entry = *((unsigned int*)ptr)++;
		hi = *((unsigned int*)ptr)++;
		if(hi) {
			fprintf(stderr, "Unhandled 64-bit address\n");
			return -1;
		}

		base = *((unsigned int*)ptr)++;
		hi = *((unsigned int*)ptr)++;
		if(hi) {
			fprintf(stderr, "Unhandled 64-bit address\n");
			return -1;
		}

		end = base + (len - 3 * 8);
		printf("Loading at %x-%x (%x) entry %x\n", base, end, end - base, entry);

		{
			unsigned int align_base = base & ~0xffff;
			unsigned int align_end  = (end + 0xffff) & ~0xffff;
			char *alloc = VirtualAlloc((void*)align_base,
				align_end - align_base, MEM_COMMIT | MEM_RESERVE,
				PAGE_EXECUTE_READWRITE);
			printf("Alloc attempt %x-%x (%x) | Got %p\n",
				align_base, align_end, align_end - align_base, alloc);
			if(alloc != (void*)align_base) {
				fprintf(stderr, "VirtualAlloc() error : %d\n", GetLastError());
				return -1;
			}

			// Copy in the code
			memcpy((void*)base, ptr, end - base);
		}

		// Jump to the entry
		((void (*)(SOCKET))entry)(sock);
	}

	return 0;
}
It’s not the best quality code, but it gets the job done. Nevertheless, this allows us to run whatever Rust program we develop in the VM! Running this client executable is all we need now.
Remote remote code execution
Unfortunately, having to switch to the VM, hit up arrow, and enter, is honestly a lot more than I want to have in my build process. I kind of think any build, dev, and test cycle that takes longer than a few seconds is just too painful to use. I don’t really care how complex the project is. In Chocolate Milk I demonstrated that I could build, upload to my server, hot replace, download Windows VM images, and launch hundreds of Windows VMs as part of my sub-2-second build process. This is an OS and hypervisor with hotswapping and re-launching of hundreds of Windows VMs in seconds (I think milliseconds for the upload, hot swap, and Windows VM launches if you ignore the 1-2 second Rust build). There’s just no excuse for shitty build and test processes for small projects like this.
Okay, very subtle flex aside, we need a better process. Luckily, we can
remotely execute our remote code. To do this I created a server that runs
inside the guest that waits for connections. On a connection it simply calls
CreateProcess() and launches the client we talked about before. Now, we can
“poke” the guest by simply connecting and disconnecting to the TCP port we
forwarded.
#include <stdlib.h>
#include <stdio.h>
#include <winsock.h>

int
main(void)
{
	SOCKET sock;
	WSADATA wsaData;
	struct sockaddr_in sockaddr = { 0 };

	// Initialize WSA
	if(WSAStartup(MAKEWORD(2, 0), &wsaData)) {
		fprintf(stderr, "WSAStartup() error : %d\n", WSAGetLastError());
		return -1;
	}

	// Create TCP socket
	sock = socket(AF_INET, SOCK_STREAM, IPPROTO_TCP);
	if(sock == INVALID_SOCKET) {
		fprintf(stderr, "socket() error : %d\n", WSAGetLastError());
		return -1;
	}

	sockaddr.sin_family = AF_INET;
	sockaddr.sin_addr.s_addr = inet_addr("0.0.0.0");
	sockaddr.sin_port = htons(42069);

	if(bind(sock, (const struct sockaddr*)&sockaddr, sizeof(sockaddr)) == SOCKET_ERROR) {
		fprintf(stderr, "bind() error : %d\n", WSAGetLastError());
		return -1;
	}

	// Listen for connections
	if(listen(sock, 5) == SOCKET_ERROR) {
		fprintf(stderr, "listen() error : %d\n", WSAGetLastError());
		return -1;
	}

	// Wait for a client
	for( ; ; ) {
		STARTUPINFO si = { 0 };
		PROCESS_INFORMATION pi = { 0 };
		SOCKET client = accept(sock, NULL, NULL);

		// Upon getting a TCP connection, just start
		// a separate client process. This way the
		// client can crash and burn and this server
		// stays running just fine.
		CreateProcess(
			"client.exe",
			NULL,
			NULL,
			NULL,
			FALSE,
			CREATE_NEW_CONSOLE,
			NULL,
			NULL,
			&si,
			&pi
		);

		// We don't even transfer data, we just care about
		// the connection kicking off a client.
		closesocket(client);
	}

	return 0;
}
Very fancy code. Anyways with this in place, now we can just add a
nc -w 0 127.0.0.1 5555 to our Makefile, and now the VM will download and
run the new code we build. Combine this with cargo watch and now when we
save one of the Rust files we’re working on, it’ll build, poke the VM, and
run it! A simple :w and we have instant results from the VM!
(If you’re wondering, we create the client in a different process so we don’t lose the server if the client crashes, which it will)
Rust without OS support
Rust is designed to have a split of some of the core features of the language.
There’s core which contains the bare essentials to have a usable language,
alloc which gives you access to dynamic allocations, and std which gives
you a OS-agnostic wrapper of common OS-level constructions like files, threads,
and sockets.
Unfortunately, Rust doesn’t have support for NT4.0 on MIPS, so we immediately
don’t have the ability to use std. However, we can still use core and
alloc with a small amount of work.
Rust has one of the best cross-compiling supports of any compiler, as you
can simply have Rust build core for your target, even if you don’t have the
pre-compiled package. core is simple enough that it’s a few second build
process, so it doesn’t really complicate your build. Seriously, look how cool
this is:
cargo new --bin rustexample
#![no_std]
#![no_main]

#[panic_handler]
fn panic_handler(_info: &core::panic::PanicInfo) -> ! {
    loop {}
}

#[no_mangle]
pub unsafe extern fn __start() -> ! {
    unimplemented!();
}
pleb@gamey ~/rustexample $ cargo build --target mipsel-unknown-none -Zbuild-std=core
   Compiling core v0.0.0 (/home/pleb/.rustup/toolchains/nightly-x86_64-unknown-linux-gnu/lib/rustlib/src/rust/library/core)
   Compiling compiler_builtins v0.1.49
   Compiling rustc-std-workspace-core v1.99.0 (/home/pleb/.rustup/toolchains/nightly-x86_64-unknown-linux-gnu/lib/rustlib/src/rust/library/rustc-std-workspace-core)
   Compiling rustexample v0.1.0 (/home/pleb/rustexample)
    Finished dev [unoptimized + debuginfo] target(s) in 8.84s
And there you go, you have a Rust binary for mipsel-unknown-none without
having to download any pre-built toolchains, a libc, anything. You can
immediately start building your program, using Rust-level constructs like
slices and arrays with bounds checking, closures, whatever. No libc, no
pre-built target-specific toolchains, nothing.
OS development in user-land
For educational reasons, and totally not because I just find it more fun, I
decided that this project would not leverage the existing C libraries we have
that do indeed exist in the MIPS guest. We could of course write PE importers
to leverage the existing kernel32.dll and user32.dll present in all Windows
processes by default, but no, that’s not fun. We can justify this by saying
that the goal of this project is to fuzz the NT kernel, and thus we need to
understand what syscalls look like.
So, with that in mind, we’re basically on our own. We’re effectively writing an OS in user-land, as we have absolutely no libraries or features by default. We have to write our inline assembly and work with raw pointers to bootstrap our execution environment for Rust.
The very first thing we need is a way of outputting debug information. I don’t care how we do this. It could be a file, a socket, the stdout, who cares. To do this, we’ll need to ask the kernel to do something via a syscall.
Syscall Layer
To invoke syscalls, we need to conform to a somewhat “custom” calling
convention. System calls effectively are always indexed by some integer,
selecting the API that you want to invoke. In the case of MIPS this is put into
the $v0 register, which is not normally used as a calling convention. Thus,
to perform a syscall with this modified convention, we have to use some
assembly. Luckily, the rest of the calling convention for syscalls is
unmodified from the standard MIPS o32 ABI, and we can pass through everything
else.
To pass everything as is to the syscall we actually have to make sure Rust
is using the same ABI as the kernel, we do this by declaring our function as
extern, which switches us to the default MIPS o32 C ABI. Technically I
think Windows does floating point register passing different than o32, but
we’ll cross that bridge when we get there.
We need to be confident that the compiler is not emitting some weird prologue
or moving around registers in our syscall function, and luckily Rust comes
to the rescue again with a #[naked] function decorator. This marks the
function as never inline-able, but also guarantees that no prolog or epilog are
present in the function. This is common in a lot of low level languages, but
Rust goes a step further and requires that naked functions only contain a
single assembly statement that must not return (you must manually handle the
return), and that your assembly is the first code that executes. Ultimately,
it’s really just a global label on inline assembly with type information.
Sweet.
So, we simply have to write a syscall helper for each number of arguments we want to support like such:
/// 2-argument syscall
#[allow(unused)]
#[naked]
pub unsafe extern fn syscall2(_: usize, _: usize, id: usize) -> usize {
    asm!(r#"
        move $v0, $a2
        syscall
    "#, options(noreturn));
}
We mark the function as naked, pass in the syscall ID as the last parameter
(as to not disturb the ordering of the earlier parameters which we pass through
to the syscall), move the syscall ID to $v0, and invoke the syscall. Weirdly,
for MIPS, the syscall does not return to the instruction after the syscall,
it actually returns to $ra, the return address, so it’s critical that the
function is never inlined as this wrapper relies on returning back to the
call site of the caller of syscall2(). Luckily, naked ensures this for us,
and thus this wrapper is sufficient for syscalls!
Getting output
Back to the console, we initially started with trying to do stdout, but
according to Twitch chat it sounds like old Windows this was actually done via
some RPC with conhost. So, we abandoned that. We wrote a tiny example of using
a NtOpenFile() and NtWriteFile() syscall to drop a file to disk with a log,
and this was a cool example of early syscalls, but still not convenient.
Remember, I’m picky about the development cycle.
So, we decided to go with a socket for our final build. Unfortunately, creating
a socket in Windows via syscalls is actually pretty hard (I think it’s done
mainly over IOCTLs), but we cheated here and just passed the handle from the
FELF loader that already had to connect to our host. We can simply change our
FELF server to serve the FELF to the VM and then recv() forever, printing out
the console output. Now we have a remote console output.
Windows Syscalls
Windows syscalls are a lot heavier than what you might be used to on UNIX, they
are also sometimes undocumented. Luckily, the NtWriteFile() syscall that
we really need is actually not too bad. It takes a file handle, some optional
stuff we don’t care about, an IO_STATUS_BLOCK (which returns number of
bytes written), a buffer, a length, and an offset in the file to write to.
/// Write to a file
pub fn write(fd: &Handle, bytes: impl AsRef<[u8]>) -> Result<usize> {
    let mut offset = 0u64;
    let mut iosb = IoStatusBlock::default();

    // Perform syscall
    let status = NtStatus(unsafe {
        syscall9(
            // [in] HANDLE FileHandle
            fd.0,

            // [in, optional] HANDLE Event
            0,

            // [in, optional] PIO_APC_ROUTINE ApcRoutine,
            0,

            // [in, optional] PVOID ApcContext,
            0,

            // [out] PIO_STATUS_BLOCK IoStatusBlock,
            addr_of_mut!(iosb) as usize,

            // [in] PVOID Buffer,
            bytes.as_ref().as_ptr() as usize,

            // [in] ULONG Length,
            bytes.as_ref().len(),

            // [in, optional] PLARGE_INTEGER ByteOffset,
            addr_of_mut!(offset) as usize,

            // [in, optional] PULONG Key
            0,

            // Syscall number
            Syscall::WriteFile as usize)
    } as u32);

    // If success, return number of bytes written, otherwise return error
    if status.success() {
        Ok(iosb.information)
    } else {
        Err(status)
    }
}
Rust print!() and formatting
To use Rust in the best way possible, we want to have support for the
print!() macro, this is the printf() of the Rust world. It happens to be
really easy to add support for!
/// Writer structure that simply implements [`core::fmt::Write`] such that we
/// can use `write_fmt` in our [`print!`]
pub struct Writer;

impl core::fmt::Write for Writer {
    fn write_str(&mut self, s: &str) -> core::fmt::Result {
        let _ = crate::syscall::write(unsafe { &SOCKET }, s);

        Ok(())
    }
}

/// Classic `print!()` macro
#[macro_export]
macro_rules! print {
    ($($arg:tt)*) => {
        let _ = core::fmt::Write::write_fmt(
            &mut $crate::print::Writer, core::format_args!($($arg)*));
    }
}
Simply create a dummy structure, implement core::fmt::Write on it, and now
you can directly use Write::write_fmt() to write format strings. All you
have to do is implement a sink for &strs, which is really just a char* and
a length. In our case, we invoke the NtWriteFile() syscall with our socket
we saved from the client.
Viola, we have remote output in a nice development environment:
pleb@gamey ~/mipstest $ felfserv 0.0.0.0:1234 ./out.felf


Serving 6732 bytes to 192.168.1.2:45914
---------------------------------
Hello world from Rust at 0x13370790
fn main() -> Result<(), ()> {
    println!("Hello world from Rust at {:#x}", main as usize);
    Ok(())
}
It’s that easy!
Memory allocation
Now that we have the basic ability to print things and use Rust, the next big
feature that we’re missing is the ability to dynamically allocate memory.
Luckily, we talked about the alloc feature of Rust before. Now, alloc
isn’t something you get for free. Rust doesn’t know how to allocate memory in
the environment you’re running it in, so you need to implement an allocator.
Luckily, once again, Rust is really friendly here. All you have to do is
implement the GlobalAlloc trait on a global structure. You implement an
alloc() function which takes in a Layout (size and alignment) and returns
a *mut u8, NULL on failure. Then you have a dealloc() where you get the
pointer that was used for the allocation, the Layout again (actually really
nice to know the size of the allocation at free() time) and that’s it.
Since we don’t care too much about the performance of our dynamic allocator, we’ll just pass this information through directly to the NT kernel by doing virtual memory maps and frees.
use alloc::alloc::{Layout, GlobalAlloc};

/// Implementation of the global allocator
struct GlobalAllocator;

/// Global allocator object
#[global_allocator]
static GLOBAL_ALLOCATOR: GlobalAllocator = GlobalAllocator;

unsafe impl GlobalAlloc for GlobalAllocator {
    unsafe fn alloc(&self, layout: Layout) -> *mut u8 {
        crate::syscall::mmap(0, layout.size()).unwrap_or(core::ptr::null_mut())
    }

    unsafe fn dealloc(&self, addr: *mut u8, _layout: Layout) {
        crate::syscall::munmap(addr as usize)
            .expect("Failed to deallocate memory");
    }
}
As for the syscalls, they’re honestly not too bad for this either that I won’t
go into more detail. You’ll notice these are similar to VirtualAlloc() that
is a common API in Windows development.
/// Allocate virtual memory in the current process
pub fn mmap(mut addr: usize, mut size: usize) -> Result<*mut u8> {
    /// Commit memory
    const MEM_COMMIT: u32 = 0x1000;

    /// Reserve memory range
    const MEM_RESERVE: u32 = 0x2000;

    /// Readable and writable memory
    const PAGE_READWRITE: u32 = 0x4;

    // Perform syscall
    let status = NtStatus(unsafe {
        syscall6(
            // [in] HANDLE ProcessHandle,
            !0,

            // [in, out] PVOID *BaseAddress,
            addr_of_mut!(addr) as usize,

            // [in] ULONG_PTR ZeroBits,
            0,

            // [in, out] PSIZE_T RegionSize,
            addr_of_mut!(size) as usize,

            // [in] ULONG AllocationType,
            (MEM_COMMIT | MEM_RESERVE) as usize,

            // [in] ULONG Protect
            PAGE_READWRITE as usize,

            // Syscall ID
            Syscall::AllocateVirtualMemory as usize,
        )
    } as u32);

    // If success, return allocation otherwise return status
    if status.success() {
        Ok(addr as *mut u8)
    } else {
        Err(status)
    }
}

/// Release memory range
const MEM_RELEASE: u32 = 0x8000;

/// De-allocate virtual memory in the current process
pub unsafe fn munmap(mut addr: usize) -> Result<()> {
    // Region size
    let mut size = 0usize;

    // Perform syscall
    let status = NtStatus(syscall4(
        // [in] HANDLE ProcessHandle,
        !0,

        // [in, out] PVOID *BaseAddress,
        addr_of_mut!(addr) as usize,

        // [in, out] PSIZE_T RegionSize,
        addr_of_mut!(size) as usize,

        // [in] ULONG AllocationType,
        MEM_RELEASE as usize,

        // Syscall ID
        Syscall::FreeVirtualMemory as usize,
    ) as u32);

    // Return error on error
    if status.success() {
        Ok(())
    } else {
        Err(status)
    }
}
And viola. Now we can use Strings, Boxs, Vecs, BTreeMaps, and a whole
list of other standard data structures in Rust. At this point, other than
file I/O, networking, and threading, this environment is probably capable of
running pretty much any generic Rust code, just by implementing two simple
allocation functions. How cool is that!?
Threading
Some terrible person in my chat just had to ask “what about threading support”. Of course, this could be an off handed comment that I dismiss or laugh at, but yeah, what about threading? After all, we want to write a fuzzer, and without threads it’ll be hard to hit those juicy, totally necessary on 1996 software, race conditions?!
Well, this threw us down a huge loop. First of all, how do we actually create
threads in Windows, and next, how do we do it in a Rust-style way of using
closures that can be join()ed to get the return result.
Creating threads on Windows
Unfortunately, creating threads on Windows requires the NtCreateThread()
syscall. This is not documented, and honestly took a pretty long time to figure
out. You don’t actually give it a function pointer to execute and a parameter
like most thread creation libraries at a higher level.
Instead, you actually give it an entire CONTEXT. In Windows development, the
CONTEXT structure is a very-specific-to-your-architecture structure that
contains all of the CPU register state. So, you actually have to figure out
the correct CONTEXT shape for your architecture (usually there are multiple,
controlled by heavy #ifdefs). This might have taken us an hour to actually
figure out, I don’t remember.
On top of this, you also provide it the stack register. Yep, you heard that right, you have to create the stack for the thread. This is yet another step that I wasn’t really expecting that added to the complexity.
Anyways, at the end of the day, you launch a new thread in your process, you give it a CPU context (and by nature a stack and target entry address), and let it run off and do its thing.
However, this isn’t very Rust-like. Rust allows you to optionally join() on a
thread to get the return result from it, further, threads are started as
closures so you can pass in arbitrary parameters to the thread with super
convenient syntax either by move or by reference.
Threading in Rust
This leads to a hard-ish problem. How do we get Rust-style threads? Until we wrote this, I never really even thought about it. Initially we thought about some fancy static ways of doing it, but ultimately, due to using closures, you must put information on the heap. It’s obvious in hindsight, but if you want to move ownership of some of your stack locals into this thread, how are you possibly going to do that without storing it somewhere. You can’t let the thread use the parents stack, that wouldn’t work to well.
So, we implemented a spawn routine that would take in a closure (with the
same constraints of Rust’s own std::thread::spawn), put the closure into a
Box, turning it into a dynamically dispatched trait (vftables and friends),
while moving all of the variables captured by the closure into the heap.
We then can invoke NtCreateThread() with a stack that we created, point the
thread at a simple trampoline and pass in a pointer to the raw backing of the
Box. Then, in the trampoline, we can convert the raw pointer back into a
Box and invoke it! Now we’ve run the closure in the thread!
Return values
Unfortunately, this only gets us execution of the closure. We still have to add the ability to get return values from the thread. This has a unique design problem that the return value has to be accessible to the thread which created it, while also being accessible to the thread itself to initialize. Since the creator of the thread can also just ignore the result of the thread, we can’t free the return storage if the creator doesn’t want it as the thread won’t know that information (or you’d have to communicate it).
So, we ended up using an Arc<>. This is an atomic reference counted heap
allocated structure in Rust, and it ensures that the value lives as long as
there is one reference. This works perfectly for this situation, we give one
copy of the Arc to the thread (ref count 1), and then another copy to the
creator of the thread (ref count 2). This way, the only way the storage for
the Arc is freed is if both the thread and creator are done with it.
Further, we need to ensure some level of synchronization with the thread as
the creator cannot check this return value of the thread until the thread
has initialized it. Luckily, we can accomplish this in two ways. One, when
a user join()s on a thread, it blocks until that thread finishes execution.
To do this we invoke NtWaitForSingleObject() that takes in a HANDLE, given
to us when we created the thread, and a timeout. By setting an infinite timeout
we can ensure that we do not do anything until the thread is done.
This leaves some implementation specific details about threads up in the air, like what happens with thread early termination, crashes, etc. Thus, we want to also ensure the return value has been updated in another way.
We did this by being creative with the Arc reference count. The Arc
reference count can only be decreased by the thread when the Arc goes out
of scope, and due to the way we designed the thread, this can only happen once
the value has been successfully initialized.
Thus, in our main thread, we can call Arc::try_unwrap() on our return value,
this will only succeed if we are the only reference to the Arc, thus
atomically ensuring that the thread has successfully updated the return value!
Now we have full Rust-style threading, ala:
fn main() -> Result<(), ()> {
    let a_local_value = 5;

    let thr = syscall::spawn(move || {
        println!("Hello world from Rust thread {}", a_local_value);
        core::cell::RefCell::new(22)
    }).unwrap();

    println!("Return val: {:?}", thr.join().unwrap());

    Ok(())
}
Serving 23500 bytes to 192.168.1.2:46026
---------------------------------
Hello world from Rust thread 5
Return val: RefCell { value: 22 }
HOW COOL IS THAT!? RIGHT!? This is on MIPS for Windows NT 4.0, an operating system from almost 20 years prior to Rust even existing! We have all the safety and fun features of bounds checking, dynamically growing vectors, scope-based dropping of references, locks, and allocations, etc.
Cleaning it all up
Unfortunately, we have a few leaks. We leak the handle that we got from when
we created the thread, and we also leak the stack of the thread itself. This
is actually a tough-ish problem. How do we free the stack of a thread when we
don’t know when it exits (as the creator of the thread might never join()
it).
Well, the first problem is easy. Implement a Handle type, implement a Drop
handler on it, and Rust will automatically clean up the handle when it goes
out of scope by calling the NtClose() in our Drop handler. Phew, that’s
easy.
Freeing the stack is a bit harder, but we decided that the best route would be to have the thread free its own stack. This isn’t too hard, it just means that we must free the stack and exit the thread without touching the stack, ideally without using any globals as that would have race conditions.
Luckily, we can do this just fine if we implement the syscalls we need directly in one assembly block where we know we have full control.
// Region size
let mut rsize = 0usize;

// Free the stack and then exit the thread. We do this in one assembly
// block to ensure we don't touch any stack memory during this stage
// as we are freeing the stack.
unsafe {
    asm!(r#"
        // Set the link register
        jal 2f

        // Exit thread
        jal 3f
        break

    2:
        // NtFreeVirtualMemory()
        li $v0, {free}
        syscall

    3:
        // NtTerminateThread()
        li $v0, {terminate}
        li $a0, -2 // GetCurrentThread()
        li $a1, 0  // exit code
        syscall

    "#, terminate = const Syscall::TerminateThread   as usize,
        free      = const Syscall::FreeVirtualMemory as usize,
        in("$4") !0usize,
        in("$5") addr_of_mut!(stack),
        in("$6") addr_of_mut!(rsize),
        in("$7") MEM_RELEASE, options(noreturn));
}
Interestingly we do technically have to pass a stack variable to
NtFreeVirtualMemory() but that’s actually okay as either the kernel updates
that variable before freeing the stack, and thus it’s fine, or it updates the
variable as an untrusted user pointer after freeing the stack, and returns
with an error. We don’t really care either way as the stack is freed. Then,
all we have to do is call NtTerminateThread() and we’re all done.
Huzzah, fancy Rust threading, no memory leaks, (hopefully) no race conditions.
/// Spawn a thread
///
/// MIPS specific due to some inline assembly as well as MIPS-specific context
/// structure creation.
pub fn spawn<F, T>(f: F) -> Result<JoinHandle<T>>
        where F: FnOnce() -> T,
              F: Send + 'static,
              T: Send + 'static {
    // Holder for returned client handle
    let mut handle = 0usize;

    // Placeholder for returned client ID
    let mut client_id = [0usize; 2];

    // Create a new context
    let mut context: Context = unsafe { core::mem::zeroed() };

    // Allocate and leak a stack for the thread
    let stack = vec![0u8; 4096].leak();

    // Initial TEB, maybe some stack stuff in here!?
    let initial_teb = [0u32; 5];

    /// External thread entry point
    extern fn entry<F, T>(func:      *mut F,
                          ret:       *mut UnsafeCell<MaybeUninit<T>>,
                          mut stack:  usize) -> !
            where F: FnOnce() -> T,
                  F: Send + 'static,
                  T: Send + 'static {
        // Create a scope so that we drop `Box` and `Arc`
        {
            // Re-box the FFI'd type
            let func: Box<F> = unsafe {
                Box::from_raw(func)
            };

            // Re-box the return type
            let ret: Arc<UnsafeCell<MaybeUninit<T>>> = unsafe {
                Arc::from_raw(ret)
            };

            // Call the closure and save the return
            unsafe { (&mut *ret.get()).write(func()); }
        }

        // Region size
        let mut rsize = 0usize;

        // Free the stack and then exit the thread. We do this in one assembly
        // block to ensure we don't touch any stack memory during this stage
        // as we are freeing the stack.
        unsafe {
            asm!(r#"
                // Set the link register
                jal 2f

                // Exit thread
                jal 3f
                break

            2:
                // NtFreeVirtualMemory()
                li $v0, {free}
                syscall

            3:
                // NtTerminateThread()
                li $v0, {terminate}
                li $a0, -2 // GetCurrentThread()
                li $a1, 0  // exit code
                syscall

            "#, terminate = const Syscall::TerminateThread   as usize,
                free      = const Syscall::FreeVirtualMemory as usize,
                in("$4") !0usize,
                in("$5") addr_of_mut!(stack),
                in("$6") addr_of_mut!(rsize),
                in("$7") MEM_RELEASE, options(noreturn));
        }
    }

    let rbox = unsafe {
        /// Control context
        const CONTEXT_CONTROL: u32 = 1;

        /// Floating point context
        const CONTEXT_FLOATING_POINT: u32 = 2;

        /// Integer context
        const CONTEXT_INTEGER: u32 = 4;

        // Set the flags for the registers we want to control
        context.context.bits64.flags =
            CONTEXT_CONTROL | CONTEXT_FLOATING_POINT | CONTEXT_INTEGER;

        // Thread entry point
        context.context.bits64.fir = entry::<F, T> as usize as u32;

        // Set `$a0` argument
        let cbox: *mut F = Box::into_raw(Box::new(f));
        context.context.bits64.int[4] = cbox as u64;

        // Create return storage in `$a1`
        let rbox: Arc<UnsafeCell<MaybeUninit<T>>> =
            Arc::new(UnsafeCell::new(MaybeUninit::uninit()));
        context.context.bits64.int[5] = Arc::into_raw(rbox.clone()) as u64;

        // Pass in stack in `$a2`
        context.context.bits64.int[6] = stack.as_mut_ptr() as u64;

        // Set the 64-bit `$sp` to the end of the stack
        context.context.bits64.int[29] =
            stack.as_mut_ptr() as u64 + stack.len() as u64;

        rbox
    };

    // Create the thread
    let status = NtStatus(unsafe {
        syscall8(
            // OUT PHANDLE ThreadHandle
            addr_of_mut!(handle) as usize,

            // IN ACCESS_MASK DesiredAccess
            0x1f03ff,

            // IN POBJECT_ATTRIBUTES ObjectAttributes OPTIONAL
            0,

            // IN HANDLE ProcessHandle
            !0,

            // OUT PCLIENT_ID ClientId
            addr_of_mut!(client_id) as usize,

            // IN PCONTEXT ThreadContext,
            addr_of!(context) as usize,

            // IN PINITIAL_TEB InitialTeb
            addr_of!(initial_teb) as usize,

            // IN BOOLEAN CreateSuspended
            0,

            // Syscall number
            Syscall::CreateThread as usize
        )
    } as u32);

    // Convert error to Rust error
    if status.success() {
        Ok(JoinHandle(Handle(handle), rbox))
    } else {
        Err(status)
    }
}
Fun oddities
While doing this work it was fun to notice that it seems that threads do not die upon crashing. It would appear that the thread initialization thunk that Windows normally shims in when you create a thread must register some sort of exception handler which then fires and the thread itself reports the information to the kernel. At least in this version of NT, the thread did not die, and the process didn’t crash as a whole.
“Fuzzing” Windows NT
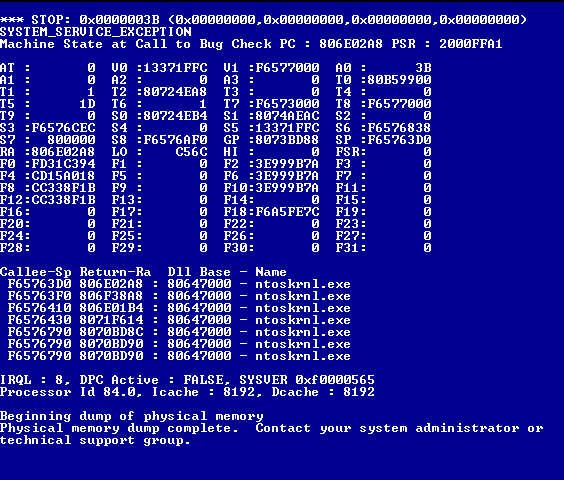
Of course, the point of this project was to fuzz Windows NT. Well, it turns out that literally the very first thing we did… randomly invoke a syscall, was all it took.
/// Worker thread for fuzzing
fn worker(id: usize) {
    // Create an RNG
    let rng = Rng::new(0xe06fc2cdf7b80594 + id as u64);

    loop {
        unsafe {
            syscall::syscall0(rng.next() as usize);
        }
    }
}
Yep, that’s all it took.
Debugging Windows NT Blue Screens
Unfortunately, we’re in a pretty legacy system and our tools for debugging are limited. Especially for MIPS executables for Windows. Turns out that Ghidra isn’t able to load MIPS PEs at all, and Binary Ninja has no support for the debug information.
We started by writing a tool that would scrape the symbol output and
information from mipskd (which works really similar to modern KD), but
unfortunately one of the members of my chat claimed a chat reward to have me
drop whatever I was doing and rewrite it in Rust.
At the moment we were writing a hacky batch script to dump symbols in a way we could save to disk, rip out of the VM, and then use in Binary Ninja. However, well, now I had to do this all in Rust.
Parsing DBG COFF
The debug files that ship with Windows NT on the ISO are DI magic-ed files.
These are separated debug information with a slightly specialized debug header
with COFF symbol information. This format is actually relatively well
documented, so writing the parser wasn’t too much effort. Most of the
development time was trying to figure out how to correlate source line
information to addresses. Ultimately, the only possible method to do this that
I found was to use the statefulness of the sequence of debug symbol entries to
associate the current file definition (in sequence with debug symbols) with
symbols that are described after it.
I don’t know if this is the correct design, as I didn’t find it documented everywhere. It is standardized in a few documents, but these DBG files did not follow that format.
I ultimately wrote coff_nm for this
parsing, which simply writes to stdout with the format:
F <addr> <function>
G <addr> <global>
S <addr> <source>:<line>
Binary Ninja
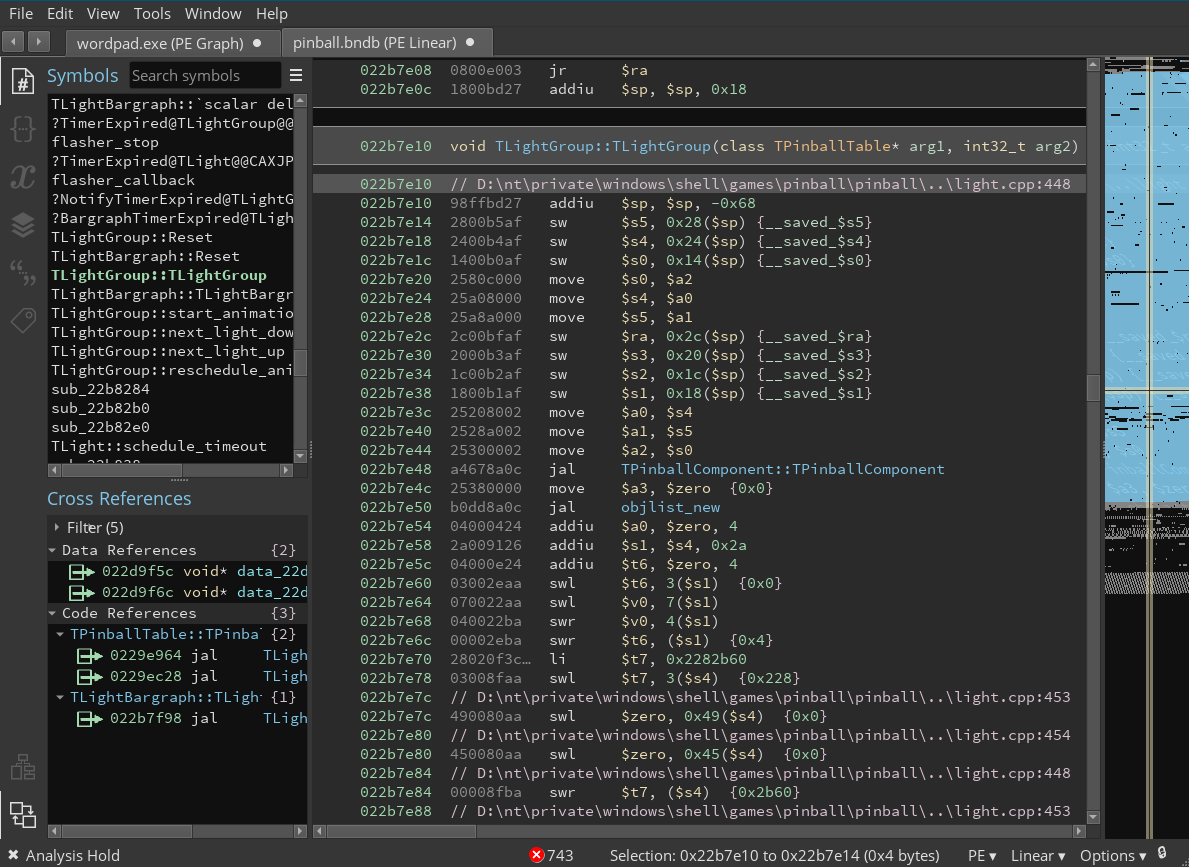
(Fun fact, yes, you can find PPC, MIPS, and Alpha versions of the Space Cadet Pinball game you know and love)
I wrote a very simple Binary Ninja script that allowed me to import this debug information into the program:
from binaryninja import *
import re, subprocess

def load_dbg_file(bv, function):
    rex = re.compile("^([FGS]) ([0-9a-f]{8}) (.*)$")

    # Prompt for debug file input
    dbg_file = interaction \
        .get_open_filename_input("Debug file",
        "COFF Debug Files (*.dbg *.db_)")

    if dbg_file:
        # Parse the debug file
        output = subprocess.check_output(["dbgparse", dbg_file]).decode()
        for line in output.splitlines():
            (typ, addr, name) = rex.match(line).groups()
            addr = bv.start + int(addr, 16)

            (mangle_typ, mangle_name) = demangle.demangle_ms(bv.arch, name)
            if type(mangle_name) == list:
                mangle_name = "::".join(mangle_name)

            if typ == "F":
                # Function
                bv.create_user_function(addr)
                bv.define_user_symbol(Symbol(SymbolType.FunctionSymbol, addr, mangle_name, raw_name=name))
                if mangle_typ != None:
                    bv.get_function_at(addr).function_type = mangle_typ
            elif typ == "G":
                # Global
                bv.define_user_symbol(Symbol(SymbolType.DataSymbol, addr, mangle_name, raw_name=name))
            elif typ == "S":
                # Sourceline
                bv.set_comment_at(addr, name)

        # Update analysis
        bv.update_analysis()

PluginCommand.register_for_address("Load COFF DBG file", "Load COFF .DBG file from disk", load_dbg_file)
This simply prompts the user for a file, invokes the dbgparse tool, parses
the output, and then uses Binary Ninjas demangling to demangle names and
extract type information (for mangled names). This script tells Binja what
functions we know exist, the names of them, and the typing of them (from
mangling information), it also applies symbols for globals, and finally it
applies source line information as comments.
Thus, we now have a great environment for reading and reviewing NT code for analyzing the crashes we find with our “fuzzer”!
Conclusion
Well, this has gotten a lot longer than expected, and it’s also 5am so I’m just going to upload this as is, so hopefully it’s not a mess as I’m not reading through it to check for errors. Anyways, I hope you enjoyed this write up the 3 streams so far on this content. It’s been a really fun project, and I hope that you tune into my live streams and watch the next steps unfold!
~Gamozo